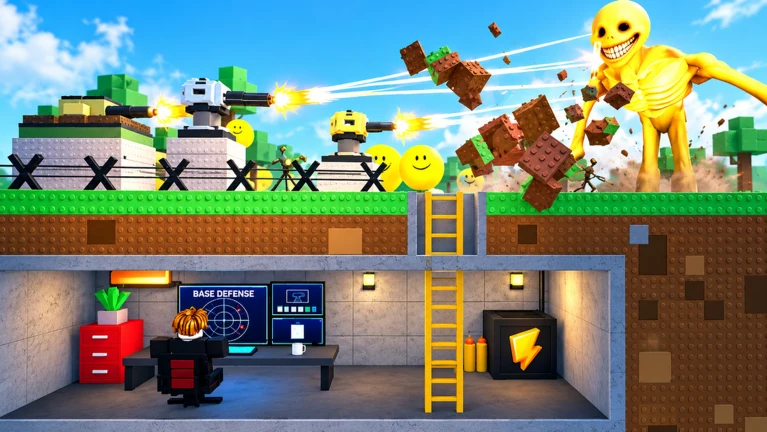
- Secret bunker areas are hidden or reinforced interior spaces used to protect defenses and players during high-pressure waves.
- Hidden-Defense Layouts keep valuable turrets behind strong walls while preserving clear firing arcs toward the approach route.
- Fallback positions matter most: a secret room is only useful if your team can retreat to it and keep repairing.
- Reserve coins before nightfall—hidden rooms without reinforced walls fail quickly against concentrated Verity attacks.
- Co-op coordination prevents duplicate construction and leaves the secret bunker properly staffed during raids.
What Is the Secret Bunker in Bunker vs Verity?
In Bunker vs Verity, the strongest bases are rarely a single open room. The most survivable designs include a concealed or reinforced interior section—what players in the community commonly call a secret bunker. This is a protected inner space placed behind the main defense line, designed to shelter your most valuable turrets, give teammates a safe repair position, and serve as a fallback when the outer walls start failing.
The core idea is simple: the outer bunker absorbs the first impact, and the secret bunker ensures you have a second line of defense that the Verities must fight through. A well-built hidden section can turn a losing wave into a recoverable one, while a poorly planned one just wastes coins and space.
A secret bunker is not about hiding everything. Overusing cover creates blind spots and reduces the effective range of your defense line. Protect your turrets, but always preserve clear firing arcs toward the main approach lanes.
Public Areas vs. Secret Bunker Areas
| Zone Type | Purpose | Defense Priority | Risk Level |
|---|---|---|---|
| Main entrance | First contact point, absorbs pressure | Highest—overlap all turret coverage | High |
| Outer rooms | Delays enemies, spread damage | Medium—reinforce attacked walls | Medium |
| Secret bunker | Protects core turrets and repair crew | High for durability, low for exposure | Low |
| Fallback corridor | Retreat route and emergency defense | Medium—keep clear of blockages | Medium |
The table above shows how each zone plays a distinct role. Skipping any of them leaves a gap the Verities will exploit during later waves.
Secret Bunker Build Types Compared
Different team sizes and wave lengths call for different hidden-room designs. Compare the four most effective approaches before committing your coins.
Compact Hidden Core
- Best for: Solo players and early survival
- Small central room with a controlled entrance
- Short wall lines are cheap to repair
- Weakness: limited space makes blocked firing angles costly
Crossfire Secret Room
- Best for: Two or more players
- Two overlapping firing directions from concealment
- Teammates cover separate approach lanes
- Weakness: crowded interiors reduce visibility if expanded without a plan
Reinforced Inner Bunker
- Best for: Extended waves and late-game runs
- Primary defense line plus protected interior route
- Secondary fallback position behind the first layer
- Weakness: large footprint costs more and is vulnerable while unfinished
Hidden-Defense Layout
- Best for: Protecting expensive turret investments
- Defenses placed behind strong structural sections
- Openings preserved toward the approach route
- Weakness: overusing cover creates blind spots and cuts effective range
Do not spend your entire starting budget on a large hidden structure before the first defense is functional. An unfinished secret bunker with exposed walls is weaker than a simple, complete compact room. Build the minimum structure needed to control the battlefield first.
Step-by-Step: Building Your Secret Bunker
Follow this sequence to construct a hidden interior section that actually survives contact with later waves. The order matters—walls before turrets, coverage before expansion.
Choose a Defensible Location
Pick a position that gives your defenses clear sightlines and leaves room for movement, repairs, and later expansion. Avoid building so tightly that walls, objects, or teammates block the firing path into your secret room.
Build the Outer Shell First
Place the main walls and entrance before anything else. The secret bunker must sit behind this primary defense line, not replace it. Keep the entrance easy to monitor and skip decorative construction during the opening phase.
Carve the Hidden Interior
Create a compact inner room with one controlled access point from the outer bunker. A single, narrow entry lets your turrets concentrate fire on anything that breaks through, instead of threats entering from multiple angles.
Place Core Defenses Inside
Position your strongest turrets in the hidden room where they cover both the entrance lane and the fallback corridor. Prioritize overlapping coverage over placing every defense in one isolated spot.
Keep a Repair Reserve
Never enter a difficult wave with an empty wallet. Maintain enough coins for emergency wall repairs and one replacement turret—hidden rooms fail when the team cannot reinforce them mid-fight.
Before nightfall, do one full walkthrough: check firing angles, clear movement paths, confirm no turret is blocked by walls, and verify every section of the outer shell is complete. This final check routinely reveals blocked turrets, exposed entrances, and missing wall pieces.
Wave-by-Wave Secret Bunker Strategy
A secret bunker serves a different purpose in each phase of a run. Use this table to know when to reinforce, when to hide, and when to hold the line.
| Wave Phase | Structure Priority | Secret Bunker Role | Coin Rule |
|---|---|---|---|
| Early waves | Close the most exposed entrances first | Optional—finish outer shell before inner rooms | Keep a reserve after first construction |
| Middle waves | Upgrade frequently attacked wall sections | Reinforce the hidden room's entry point | Save for one emergency repair plus one turret |
| Late waves | Reinforce weakest sections before nonessential work | Full fallback position—retreat and repair here | Enter the wave with a reserve, not empty pockets |
| Between waves | Inspect damage, find the next breach point | Restaff turrets, reload, reassign roles | Split coins between repairs and next upgrade |
During high-pressure waves, protect the bunker core, repair immediately after damage spikes, and concentrate fire on the most dangerous Verity first. Chasing enemies away from the defensive zone creates openings—maintain the bunker while dealing with threats instead of abandoning it.
Do not rely on income earned during an attack. Treat late-wave rewards as reinforcement funds for the next round, not as spending money available mid-fight. Teams that commit their full reserve before a difficult wave lose their fallback room when it matters most.
Co-op Roles for Defending the Secret Bunker
Coordinated teams defend hidden rooms far better than solo builders. Divide responsibilities so no lane goes unattended and no purchase is duplicated.
| Team Size | Recommended Roles | Key Responsibilities |
|---|---|---|
| Two players | Builder and Defender | Builder handles walls and repairs; defender holds the strongest firing position; both agree on purchases |
| Three players | Builder, Gunner, Scout | Gunner runs hidden-room turrets; scout reports weak points early so builder reinforces in time |
| Four or more | Dedicated Defense Team | One on construction, turret operators on primary lanes, one flexible responder, one resource coordinator |
| Any size | Wave Coordinator | Confirms repairs before each wave, checks firing positions are staffed, delays optional purchases |
Use short, specific callouts: the affected lane, the required repair, and the urgency level. Make the plan during the preparation window between waves, not after enemies are already attacking.
Use this checklist at the start of every preparation window:
Between-Wave Preparation:
- Outer shell fully repaired with no missing wall sections
- Hidden room entry point reinforced and monitored
- All turret firing arcs clear of walls and teammates
- Repair coin reserve set aside before the next wave
- Team roles confirmed and lanes assigned
FAQ
Q: What is the secret bunker in Bunker vs Verity?
It is a concealed or reinforced interior section built behind your main defense line. It protects your most valuable turrets, gives the team a safe repair position, and serves as a fallback when outer walls start failing during later waves.
Q: Should I build a secret bunker in the early game?
Not first. Complete the outer shell and initial defenses before investing in a hidden interior. An unfinished secret bunker with exposed walls is weaker than a simple, complete compact room, and spending your entire starting budget on it leaves nothing for repairs.
Q: Can a secret bunker block my own turrets?
Yes. Overusing cover creates blind spots and reduces the effective range of your defense line. Place defenses behind strong structural sections but always preserve clear openings toward the approach route so firing arcs stay unobstructed.
Q: How much should I keep in reserve when using a hidden room strategy?
Enter difficult waves with enough coins for one emergency wall repair and one replacement or additional turret. Never rely on income earned during an attack—treat late-wave rewards as reinforcement funds for the next round.
This guide covers the fundamentals of hidden-room construction and defense in Bunker vs Verity. For team layouts, turret rankings, and economy planning, check the related guides on bunker builds and wave survival strategy.