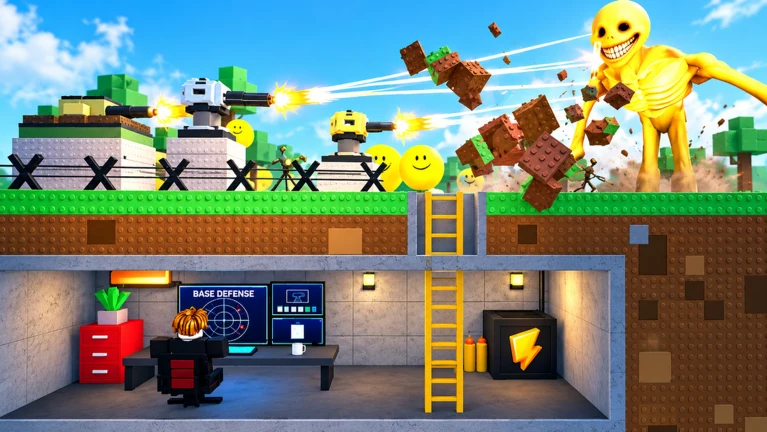
- Bunker vs Verity base design depends on team size, resources, and expected wave length.
- Compact solo layouts prioritize entrance coverage and structural durability.
- Co-op bunkers need overlapping firing lanes and clearly divided responsibilities.
- Long-wave builds require a fallback line and a coin reserve for repairs.
- Never spend your full balance before nightfall — a repair reserve wins runs.
Bunker Fundamentals in Bunker vs Verity
In Bunker vs Verity, your bunker is the difference between surviving the night and restarting. A strong base does four things at once: it protects the entrance, preserves clear firing lanes for turrets and players, keeps a safe interior movement route, and includes a fallback position for emergency repairs. Every layout decision should serve at least one of these goals.
The most common mistake new players make is over-building early. Decorative rooms, oversized footprints, and duplicate defenses drain coins that should be reserved for wall repairs and turret replacements when the Verities actually arrive.
| Design Principle | What It Means | Common Mistake |
|---|---|---|
| Entrance control | One monitored, defensible entry point | Multiple unwatched openings |
| Firing lanes | Clear sightlines from turrets and players | Walls blocking turret arcs |
| Movement route | Safe path for repairs inside the bunker | Cluttered interior blocking players |
| Fallback line | Secondary position behind the first layer | No backup when the front fails |
| Resource reserve | Coins kept for emergency repairs | Spending everything pre-wave |
Do not spend your entire starting budget on optional structures before the first defense is functional. An unfinished large bunker is more vulnerable than a finished small one.
Best Bunker Builds Compared
The strongest layout depends on how many players you have and how deep into the waves you plan to survive. These four archetypes cover nearly every situation in the game.
Compact Solo Bunker
- Best for: Solo players and early survival
- Small central room with a controlled entrance
- Short wall lines, defenses on the primary approach
- Weakness: Blocked firing angles are extremely costly
Cooperative Crossfire Bunker
- Best for: Two or more players
- Central area with two overlapping firing directions
- Divided repair and building responsibilities
- Weakness: Crowding reduces visibility if expanded without a plan
Long-Wave Reinforced Bunker
- Best for: Extended survival and late waves
- Primary defense line plus protected interior route
- Secondary fallback position behind the first layer
- Weakness: Larger footprint costs more and is weak while unfinished
Hidden-Defense Layout
- Best for: Protecting valuable turrets
- Defenses placed behind strong structural sections
- Openings preserved toward the approach route
- Weakness: Overused cover creates blind spots and cuts range
| Build | Survivability | Cost | Difficulty | Best Team Size |
|---|---|---|---|---|
| Compact Solo | ★★★☆☆ | Low | Easy | 1 |
| Crossfire Co-op | ★★★★☆ | Medium | Medium | 2-3 |
| Long-Wave Reinforced | ★★★★★ | High | Hard | 2-6 |
| Hidden-Defense | ★★★☆☆ | Medium | Medium | Any |
Protect valuable turrets with structure, but never block their firing arcs. If a turret cannot hit the approach lane, it is wasted coins regardless of how safe it looks.
Step-by-Step Bunker Construction
A reliable opening sequence matters more than any specific layout. Follow this order when a new run begins.
Choose a defensible location
Pick a position with clear sightlines for your defenses and room for movement, repairs, and later expansion. Avoid terrain that funnels you into a corner.
Build the core structure
Place the main walls and entrance first, then a compact interior that can be reinforced without wasting early resources. Skip decoration entirely.
Place first defenses
Position turrets where they cover the approach to the entrance and the most likely attack lane. Prioritize overlapping coverage over isolated placements.
Earn and preserve coins
Use safe daytime windows to earn coins while keeping enough funds for repairs, extra walls, and emergency defenses. A reserve beats a small early upgrade.
Prepare for the night
Do a final inspection: check firing angles, clear movement paths, confirm every wall section is closed, and get the team inside the defensive zone.
Respond to Verities
During the attack, watch the approach, repair damaged sections, and shift attention to the weakest side of the bunker instead of chasing enemies away from the defense zone.
A 30-second pre-night check often reveals blocked turrets, exposed entrances, and missing wall sections — the three most common causes of early run failures.
Wave-Phase Defense Priorities
Enemy waves scale in difficulty as the match progresses, so your spending should shift with each phase rather than following a fixed plan.
| Phase | Wall Priority | Turret Priority | Coin Rule |
|---|---|---|---|
| Early waves | Close exposed entrances before upgrades | One turret covering the main approach | Keep a reserve after first builds |
| Middle waves | Upgrade frequently attacked sections | Add coverage only when a lane slips through | Save for repair plus one upgrade |
| Late waves | Reinforce weakest structural sections | Upgrade effective positions, keep overlap | Enter hard waves with a reserve |
| Between waves | Inspect damage, find next breach point | Check firing angles and coverage gaps | Split coins between repairs and upgrades |
Treat late-wave rewards as reinforcement funds, not guaranteed expansion money. Committing your full reserve before a difficult wave is the fastest way to lose a run.
Every-Run Bunker Checklist:
- Seal all entrances before the first night
- Confirm turret arcs are not blocked
- Keep a coin reserve at all times
- Assign repair roles in co-op runs
- Inspect damage between every wave
Co-op Bunker Roles
Duplicate purchases and unattended breaches sink more co-op runs than enemy pressure does. Divide responsibilities before the wave starts, not during it.
| Team Size | Recommended Roles | Key Coordination |
|---|---|---|
| 2 players | Builder + Defender | Communicate before any coin purchase |
| 3 players | Builder, Gunner, Scout | Scout calls threats early for reinforcement |
| 4+ players | Builder, turret operators, flex, resource coordinator | Short, specific callouts: lane, repair, urgency |
In any team size, designate one player to confirm repairs are done, firing positions are staffed, and the coin reserve is intact before each wave begins.
FAQ
Q: What is the best bunker layout in Bunker vs Verity for solo players?
The Compact Solo Bunker is the most reliable solo choice: a small central room with a controlled entrance, short wall lines, and defenses covering the primary approach. Its limited space makes correct wall placement and unobstructed turret arcs especially important.
Q: Should I upgrade walls or add more turrets first?
Upgrade whichever element is directly limiting your survival. If a wall section is repeatedly damaged, reinforce it first. Only add turrets when a lane is consistently slipping through or existing firepower cannot clear a wave efficiently — adding turrets to poor positions wastes coins.
Q: How many coins should I keep in reserve?
Maintain enough for at least one emergency repair, one defensive upgrade, and one replacement turret. Enter difficult late waves with a reserve rather than relying on income earned during the attack.
Q: How do I stop my turrets from being blocked?
During your pre-night inspection, trace each turret's firing arc toward the likely approach lane. Remove walls, objects, or player-built structures inside the arc, and avoid placing defenses so far behind cover that their effective range is reduced.